


Big-time struggles for my 8th graders on this problem from Five Triangles Mathematics.

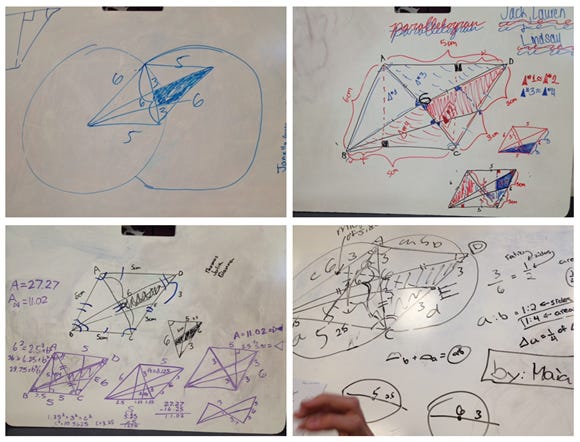
The one student who eventually solved it still had to wrestle with it, but he stuck to our class rule of never tell an answer. From their boards and explanations, it was clear they were trying hard:
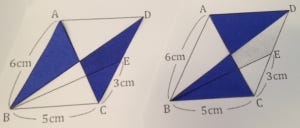
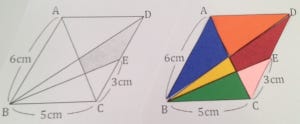
They wanted to find the area of the parallelogram first.
To do that, they needed the height.
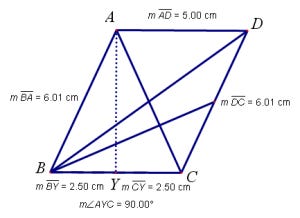
They assumed triangle ABC was isosceles and that the perpendicular bisector AY was also the height of the parallelogram. Then they tried using the Pythagorean theorem to find AY.
(But I couldn’t even get AB and DC to both be exactly 6.00 cm.)
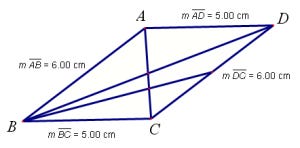
To throw in a gentle reminder not to trust appearances, I showed them a different parallelogram and reminded them that just looking isosceles doesn’t make it so.
Without a clear path to the height, their frustration grew. Still, props to them for sticking with it — their whiteboards were full of creative dissections, all in pursuit of figuring out that shaded region.
Day 2: Enter Technology
I let them stew some more the next day. They still didn’t see what I thought were key pieces, so I nudged them:
“Look at the relationships among the parts.”
Some remembered that the diagonals of a parallelogram cut it into four triangles of equal area. Then... they got stuck again.
So I handed over the tech: “Construct the parallelogram in Geometer’s Sketchpad (GSP).”
One student asked, “What should the angles be?”
Me: “It doesn’t say. But it is a parallelogram — just make sure opposite sides are equal in length.”
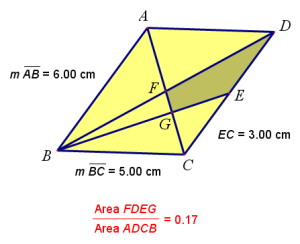
Once they built it, they found the shaded area pretty quickly. Different students had slightly different versions of the parallelogram, but they all got the same result: 0.17 or 1/6.
Why GSP?
Me: “So why did I ask you to use GSP?”
Student: “Because we couldn’t do it by hand?”
Me: “Maybe. Or maybe you didn’t have enough time. But what’s different about using GSP?”
Student: “We can move things around.”
Me: “Exactly. It’s dynamic. So move the points. Drag the sides. Change the lengths. And while you’re doing all this, watch what happens to the measurements.”
Before long: “The ratio doesn’t change!”
Now we were getting somewhere.

Making Relationships Visible with Construction Paper
To push the ideas further, I used colored construction paper to highlight key relationships. Here's why:
Instead of referring to “triangle ABC” or “quadrilateral FDGE,” I could just point to colors.
Students didn’t have to track letters — they could just see the visuals.
I could physically place one piece on top of another to show congruence.
Some of what we discovered:
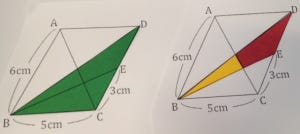
The diagonals cut the parallelogram into two pairs of congruent triangles → each blue = ¼ of the whole.
The green quadrilateral = ½ of the whole.
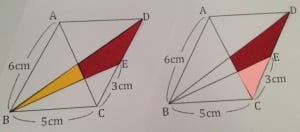
Red + yellow = ½ of green = ¼ of the whole.
Red + pink = ¼ of the whole → so yellow = pink.
Blue + yellow is similar to pink by AA postulate. Since side lengths are in a 2:1 ratio, the areas are in a 4:1 ratio. If pink is 1, yellow is 1, so blue must be 3.
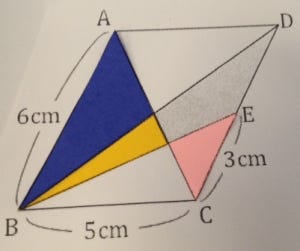
Total area = 12 → shaded red = 2/12 = 1/6
Highlight from the Comments (Old Blog)
Kate Nowak (Feb 5, 2014):
Your kids have enough GSP skills to use it to investigate a problem. Kudos! I did it a different way — I constructed a supporting parallel line to help dissect the quadrilateral.
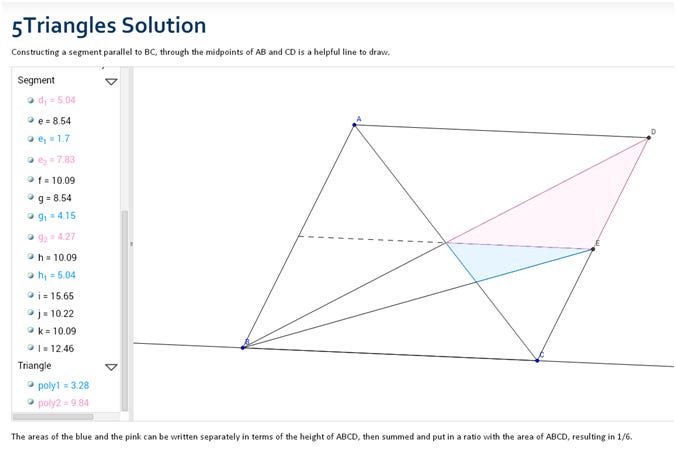
My reply (Feb 10, 2014):
Beautiful work, Kate! One of my students asked how to find the area of a non-parallelogram/trapezoid like FDEG. I said, “Can you break it into shapes whose areas you do know?” Some groups drew in that same parallel line. They were able to find the pink triangle’s area but struggled with the blue. Thanks again for sharing.